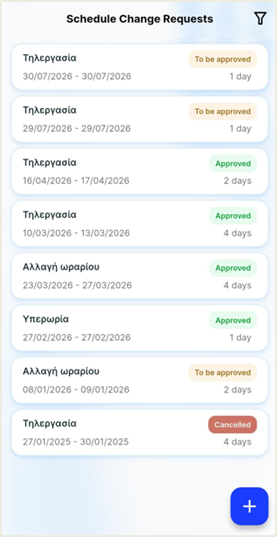
This section allows the employee to request a change in their fixed working hours for specific dates, remote work or overtime. This process ensures that management and HR are fully informed of changes in Attendance.
On the main screen, all submitted requests are displayed chronologically.
Request Details: Each entry shows the type of request, the time interval (from/to), the total number of days for the request and the date of submission.
State: On the right of each card there is a color indication for the state of the request: “To be approved” (orange), “Approved” (green), “Canceled” (dark red) or “Rejected” (bright red).
Add new: The blue "+" icon is available to add a new request directly.
To quickly locate specific entries, you can use the filter icon  .
.
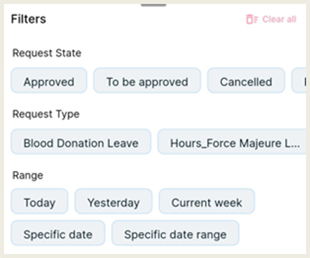
State & Type: You can filter the list by selecting only the requests that are at a specific stage (e.g. "Approved") or for a specific category (e.g. only "Schedule change"). Please note that only the types that the employee has already registered at least once in the past are shown in the "Request type" selection list.
Time intervals: Default options such as "Today", "Yesterday", "Current week", "Specific date" or "Specific date range" are provided to limit the results.
Clean all: For your convenience, the "Clean all" option has been added. This action resets all applied filters to zero at the same time and returns the list to its full, original view without having to de-select each criterion separately.
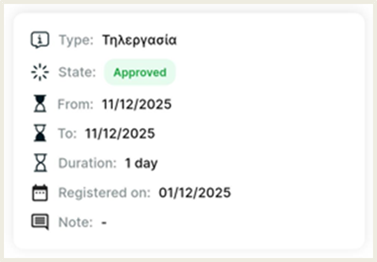 Overview of a Specific Request
By selecting a request from the list, all of its items in total are displayed.
You can see request type, the state, the exact dates and the total duration in days.
At the bottom you can view the date of submission.
Editing: If a request has "To be approved" as state, the user can choose to edit it to make corrections.
Changing the Request type is not possible.
Note that:
The ability to edit ceases to be available once the request changes state (e.g., is “Approved” or “Rejected”). In this case, any change requires contacting HR or submitting a new request.
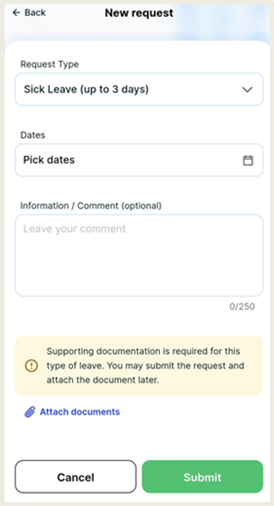 Adding a new request
The submission of requests (schedule change, remote work, overtime) is carried out through a common and user-friendly process.
The steps to submit the request are:
Starting the Process: On the requests screen, select the blue "+" icon at the bottom right. The request type selection menu will open.
Selecting a Type: From the list that appears, select the category that concerns you: “Schedule change”, “Remote work” or “Overtime”.
Setting Dates: Use the built-in calendar to set the exact date (or time range) for which you are submitting the request.
Filling in the Details: In the “Information / Comment” field, please provide the necessary reasons for your request. Clear wording makes it easier for your supervisor to process and approve the requests faster.
If required, enter the working hours (in case of changing hours) in the corresponding fields.
Finalizing: After completing all fields, press the “Save” button (or the submission icon). Your request will be automatically entered in your history marked "To be approved".